• Skip to primary navigation
  • Skip to main content
  • Skip to primary sidebar

Hello Nest

The Art of Making a Home

  • Green Cleaning
    • Air Fresheners
    • Bathroom
    • Bedroom
    • Kitchen
    • Laundry
  • Natural Living
    • Homemade Recipes
    • Essential Oils
    • Plants & Flowers
    • Zero Waste
    • Organizing & Simplifying
  • DIY & Decor
    • Candle Projects
    • Holiday Projects
    • Sewing Projects
  • About
    • Contact
    • Privacy Policy
  • Nav Social Menu

    • Facebook
    • Instagram
    • Pinterest
    • YouTube

How To Make an Easy DIY Ear Cuff

0 · Sep 5, 2013 · Stephanie Gerber · 12 Comments

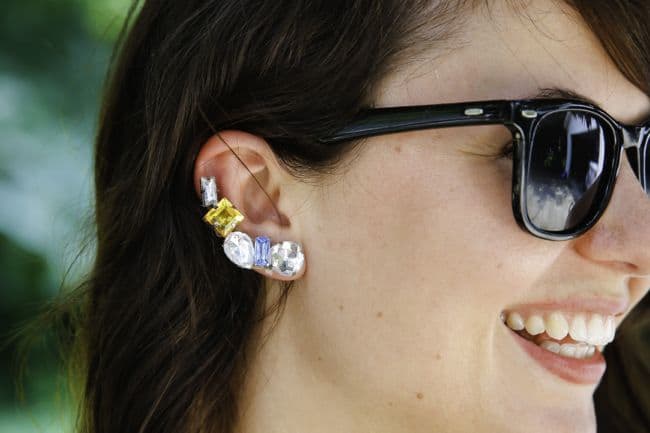
Who else is itching to make earrings? I say it’s time to try an ear cuff! Honestly, it’s so easy to DIY and makes a perfect statement piece. Just remember you only need one!

DIY Ear Cuff | Hello Glow

This idea came from Caroline and her love of all things dress up, make-up and jewels. Fully decked out in princess gowns, she and her cousin Sofia found my stash of gem stickers and started sticking them on their ears as earrings. So we took their sparkly idea and ran with it!

DIY Ear Cuff

Supplies needed:

  • Dimensional gem stickers
  • Small piece of felt
  • E-6000
  • Hot glue
  • Flat earring back
See also
How to Make a Nautical Knot Bracelet

DIY Ear Cuff | Hello Glow

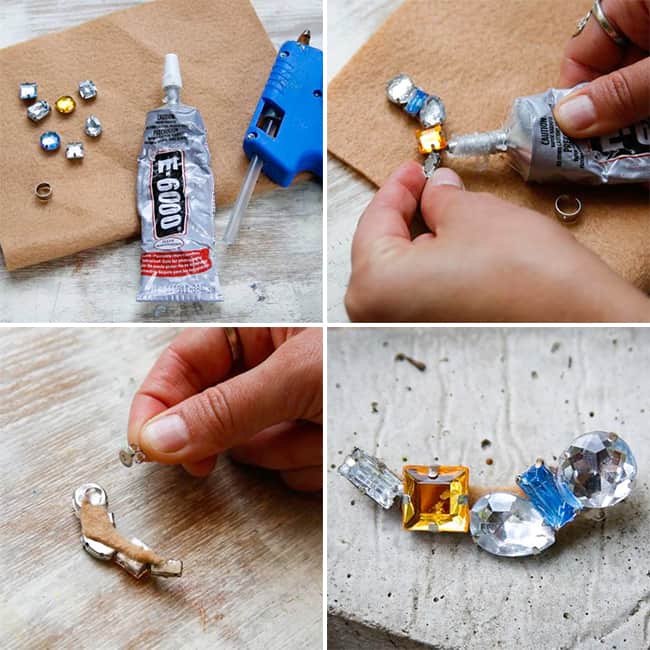
Arrange the gems on a piece of felt, keeping a slight curve and the largest gems at the bottom. One you like the design, glue the sides of the gems together with E-6000. Let the glue dry completely and cut away the felt. With a dab of hot glue, attach a flat earring backing to the bottom gem.

In the making process we realized that a flat earring back worked much better than an actual ear cuff. (This was, of course, after waiting 3 weeks for the cuffs to arrive in the mail.) The cuffs made it hard to position the earring on the ear so I don’t really recommend them.

See also
Freeze the Season With a Make-Ahead Hearty Vegetable Soup

How to Make an Ear Cuff

After experiencing a bit of earring droopage, we learned from the Honestly WTF girls that using an earring stabilizer on the back keeps the earring in place. Excellent tip!

Share this:

  • Click to share on Facebook (Opens in new window)
  • Click to share on Twitter (Opens in new window)
  • Click to share on Pinterest (Opens in new window)
  • Click to email a link to a friend (Opens in new window)

Uncategorized

More Posts from Uncategorized

  • These Greens and Mushroom Stuffed Shells Are the Perfect Freezer Meal

  • 3 Gorgeous Veggie Popsicles (Yes, Veggie) to Beat the Heat

  • This Sweet + Spicy Stir-Fry Makes Meatless Monday a Breeze

  • Gluten-Free Butternut Squash and Apple Crumble with Whipped Coconut Cream

  • The Perfect Grain-Free Paleo Pumpkin Pie

  • Whole30 One-Pan Mexican Chicken + Veggies


Reader Interactions

Comments

    Leave a Reply Cancel reply

    This site uses Akismet to reduce spam. Learn how your comment data is processed.

  1. Patricia says

    September 5, 2013 at 12:25 pm

    So cute! Love these!

    Reply
  2. [email protected]'s Recipes says

    September 5, 2013 at 2:00 pm

    Very adorable!

    Reply
  3. Mo says

    September 5, 2013 at 2:16 pm

    This is a cute DIY. I’ve been wanting an ear cuff for a while now. Gonna give this a try once I get some time. 🙂

    Reply
  4. Eleanor says

    September 5, 2013 at 2:46 pm

    Love this. I have a nickel allergy, so I can’t wear the conventional kind, but this looks like something I can do and wear. Thanks.

    Reply
  5. Tiffani says

    September 5, 2013 at 3:07 pm

    It’s a little gaudy in my opinion.. I would like to see something a little more low key..

    Reply
  6. Susanna says

    September 6, 2013 at 6:02 am

    Very cool, Sofia and Caroline would love these I’m sure 🙂

    Reply
  7. Lisa says

    September 7, 2013 at 2:13 pm

    This is such a great idea! I’m going to make a bracelet with this technique.

    Reply
    • gerbermom says

      September 12, 2013 at 12:13 pm

      That sounds like an awesome idea Lisa! Those gem stickers are my new favorite thing. Let me know how it turns out!

      Reply
  8. Theresa says

    September 12, 2013 at 1:35 pm

    This is yet another one where we can use an old water bottle. Being clear and thin you can cut it into any shape you want yet it is strong enough to keep it’s shape when all those gems are added.
    I use water bottles in place of felt for anything I need stability for. I am SO gonna try this one!

    Reply
    • gerbermom says

      September 18, 2013 at 1:06 pm

      That is such a good idea! Perfect way to recycle.

      Reply
  9. Samantha says

    September 17, 2013 at 8:27 am

    Those sticker gems are a great find. I’ve been looking everywhere for something like that.

    Reply
    • gerbermom says

      September 18, 2013 at 12:30 pm

      I’m still finding the girls’ “earrings” all over the house – now Caroline wants her ears pieced. Oy vey.

      Reply

Primary Sidebar

Get updates + more!

Get the exclusive content you crave straight to your inbox.

Featured DIY

How to Make Reusable T-shirt Wipes

How to Make Your Own Foaming Hand Soap (+ Best Essential Oils for Hand Washing)

7 Ways To Use Essential Oils in the Bedroom + 4 Diffuser Blends

How To Season + Clean A Cast Iron Skillet

How To Dust The Right Way

More

We are a participant in the Amazon Services LLC Associates Program, an affiliate advertising program designed to provide a means for us to earn fees by linking to Amazon.com and affiliated sites.
  • Contact
  • Privacy Policy
  • Hello Glow
  • Hello Veggie

Copyright © 2022 · Seasoned Pro